Tag Archives: about a buck

Roast Chicken Drumsticks

Hi!

Tonight, I once more made a dinner with chicken drumsticks. (They’re still inexpensive.)

For the recipe tonight, instead of making soup, I roasted them with a bit of seasoned butter. They turned out quite nicely.

Ingredients

  1. Chicken drumsticks (Skin on)
  2. 2-3 Tbsp Butter (I used salted this time, and therefore did not include more salt in the recipe)
  3. 2-3 cloves of garlic (minced) (1 clove per Tbsp of butter)
  4. 1 tbsp(ish) lemon juice
  5. Large pinch of Basil
  6. Larger sprinkle of Parsley
  7. 2 Shakes of paprika (separated)

Directions

  1. Preheat oven to about 425 f.
  2. Soften butter
  3. Mix butter with the garlic, lemon juice, and herbs
  4. Rinse chicken, pat dry, place in a baking pan.
  5. Put seasoned butter underneath the skin of the chicken, and on top
  6. Sprinkle the chicken with more lemon juice and a touch more paprika
  7. Bake until chicken is thoroughly prepared (juices run clear, internal temperature appropriate, etc. For me, I cooked it for about an hour. That may have been overkill. But it worked.)
  8. Enjoy! I also cooked up some rotini to go with.

I accidentally made savoury Jello, and it’s good.

Hello!

So, the other day, I decided to make chicken soup. It turned out nicely. It turned out so nicely, in fact, that it turned to jello when I refrigerated it. (That’s apparently one of the signs of a really well-done chicken stock. It has something to do with getting all the flavor from the chicken bones, and chicken bones being a common basis for gelatin and stuff.)

But, yeah. It made a good soup. And it can be reheated from its jello form into soup. So, here’s the recipe.

Chicken Soup / pre-Savoury-Jello

Ingredients

  1. 3-4 pounds of drumsticks. These should be really inexpensive. (I paid about $0.69  a pound.) I actually initially made the soup because I wanted the drumsticks. The fact that the soup turned out so well was an added bonus! This ended up being about 12-14 drumsticks. (I’m not entirely sure. I miscounted a few times. And it doesn’t really matter…) Price (rounded): $3
  2. 1 medium sweet onion, sliced. Call it about $1.
  3. Carrots. (I used about a third-bag of baby carrots, since I eat those for snacks anyway, and didn’t want to deal with peeling and chopping and stuff.) Call it about $0.50
  4. Salt to taste
  5. Water.
  6. (Optional: some lemon juice, other seasonings.)

Instructions

First some pre-instructions.

  1. Remove the skin from some of the drumsticks. (Semi-optional. This makes it a bit easier for the skimming later on.)
  2. Slice the onions.

In whatever size pot you have that will hold your ingredients and let you fill it with water so that it won’t boil over…

  1. Place the drumsticks in the pot.
  2. Cover with water. (Make sure the drumsticks are all covered.)
  3. Put in onions, carrots, and salt.
  4. Bring to a rolling boil, stirring occasionally.
  5. Skim the surface as you go. (Lots of stuff from the skin and stuff will come up to the top. It increases the chance of boil-overs.) Be careful to leave the onions and carrots in.
  6. Let it continue to boil until the chicken is fully cooked. Yes, some recipes call for it to simmer. It probably turns out better. I don’t know. But this is what I’ve done, and it still tastes good. And it gets done in generally between 20 and 40 minutes. You’ll know it’s either done, or close to being done, when the meat starts falling off the bones.
  7. If you’re like me, let it continue to boil for another 3-5 minutes, just to be extra sure.
  8. Remove the chicken from the pot, for easier access to the broth.
  9. Skim the fat and stuff. (Or wait to do that the next day after it’s refrigerated, and have a really rich soup that night. My default. Especially as I do skim some of the stuff with a large spoon as I go.)
  10. Serve it up, and enjoy. Depending on how much water you use, you should get at least 4 meals out of it. And lots of snacks with the drumsticks.
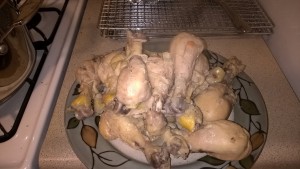
A pile of chicken drumsticks.
This is (part of) what $3 can get you. 🙂

Mocha Meltdown Madness

Hi, readers!

It’s getting on towards the end of the quarter for me. At some point I’m going to need to do a series of posts on the interesting snacks I’ve experimented with, but I don’t have the time.

I do have the time, though, to share a fairly quick coffee drink recipe with you. It’s a white-chocolate, chocolate, peppermint drink I’m calling “Mocha Meltdown Madness” for a few reasons.

A) Alliteration. Duh.

2) Chocolate. I’m getting towards (2ards? Meh) the end of the quarter, which means that chocolate is required to prevent / help with “meltdowns.” Also, chocolate melts. So, it’s a pun.

last) Madness. Why didn’t I think of this before? Why is the end of the semester so busy? Why are all these ingredients in the same cup tasting so good? Madness, I tell you!

Mocha Meltdown Madness

Ingredients

  • 1-2 ounces of milk (per 10 ounces of coffee, up to you.  It depends on the size of your mug.) Cream would be better, but hey- grad school budget. (negligible price / not worth the time of estimation.)
  • 10 ounces of coffee, thereabouts. (About 30 cents, according to my Dad’s calculations. Or free, if you get someone else to buy the coffee for you.)
  • About 1 TBSP white chocolate chips (negligible cost)
  • About 1 TBSP bittersweet chocolate chips (negligible)
  • 5-6 drops peppermint extract / a bit less than 1/4 tsp. (If you don’t like peppermint that much, even though it helps with concentration so it’s practically a necessity / healthy for students, use less.) (negligible)
  • A small capful of vanilla (optional). Or a big capful. But that’ll change the flavor. Obviously.

Directions

  • Heat milk, either in microwave or saucepan/skillet/stovetop-safe-thingy until it is hot enough to melt your chocolate
  • Add the chocolate chips, peppermint, and vanilla
  • Stir/whisk together until blended
  • Stick in microwave again, to ensure that your coffee stays hot for as long as possible. I use about 45 seconds on 20% power. Or use whatever setting you would for melting chocolate.
  • Pour coffee into mug, stir again.
  • (Optional: If you have whipped cream, put on top. Peppermint sprinkles would make a nice garnish. However, since this is a recipe by a graduate student, the original recipe does not have anything like that. After all, I choose not to afford cream on a regular basis. So, no whipped cream… for a regular thing.)
  • Test it. If necessary, or if merely desired, add more chocolate chips. White chocolate chips makes the drink sweeter, whereas bittersweet makes it more, well, chocolatey.
  • (nonoptional) Enjoy.

Total price? Probably less than a buck. But does it matter? Nope. It is SO. WORTH IT.

I hope you enjoy!